2009년 5월 28일 목요일

[내장형시스템] Xstation에 인증관련 라이브러리 포팅

우선 인증관련하여 필요한 것들로는

1. libusb - 0.0.12

2. ccid-1.3.6 driver

3. pcsc-lite 1.4.101

세가지가 필요하다.

이를 Xstation에 포팅하기 위해서는 libusb 라이브러리를 포팅하고,

pcsc-lite를 포팅하고 ccid driver를 포팅해야 한다.

세가지 모두 configure -> make -> make install 의 과정으로 파일을 생성하며

Xstation의 경우 ARM7 계열 프로세서를 사용하기 때문에 arm용 gcc로 크로스 컴파일 하여야만 한다.

워낙 configure 스크립트가 복잡한 관계로(사실 잘 모르기 때문에;;;) 무슨 옵션을 주어야 하는지 몰라

무지막지한 에러메세지가 나타났다.

그래도 1,3은 몇개의 warning이 발생하였지만 이상없이 파일이 만들어졌다.

libusb-0.0.12

1. src 압축해제

2. ./configure --host=arm-linux --prefix=나중에 파일이 생성될 경로 --exec_prefix=파일이 실행될
경로

나같은 경우 prefix와 exec_prefix를 동일 경로로 지정했다.

3. make; make install

pcsc-lite 1.4.101

1. src 압축해제

2. configure 파일내 cross compile = yes로 변경

3. CC=arm-linux-gcc ./configure --prefix=경로 --exec_prefix=경로 --disable=libhal

PKG_CONFIG_PATH=libusb 라이브러리 설치 경로/pkgconfig

4. make; make install

ccid의 경우 make시 library를 제대로 링크못하여 에러가 난다.

추후 에러를 잡고 추가 포스팅 예정

원본출처: http://duo830210.tistory.com/archive/200805

2009년 4월 22일 수요일

tftp hpa 서버 설치하기

tftp hpa 서버 설치하기 리눅스

2008/10/02 01:23

복사 http://blog.naver.com/phyojae/80056481348


tftp는 커널이미지를 올릴때 많이 쓴다

어쨋던 tftp를 설치해야되요


설치가 되어있다면 상관없지만 안되어있다면 설치해야되요


<레드햇 9 2.4.18 버전>

1. rpm 파일 가져오기
레드햇 계열은 cd속에 파일이 있다
시디 속에 보면 rpm 폴더가 있음
파일명은
tftp-0.32-4.i386.rpm
tftp-server-0.32-4.i386.rpm

2. 설치
rpm -Uvh tftp-0.32-4.i386.rpm
rpm -Uvh tftp-server-0.32-4.i386.rpm

3. tftpboot 폴더만들기

mkdir /tftpboot

(최상위에 만들어야되요 / 환경 설정에서 변경 가능, 옵션으로 설정함)

tftp 서버를 실행하면 이폴더에서 파일을 찾습니다.

윈도우를 생각하면 공유폴더 정도나 ftp서버정도로 생각하시고 기본 저 폴더로 공유가된다고

생각하시면 됩니다

4. tftp 실행하게 설정 바꾸기

vi /etc/xinit.d/tftp

# default: off
# description: The tftp server serves files using the trivial file transfer \
# protocol. The tftp protocol is often used to boot diskless \
# workstations, download configuration files to network-aware printers, \
# and to start the installation process for some operating systems.
service tftp
{
socket_type = dgram
protocol = udp
wait = yes
user = root
server = /usr/sbin/in.tftpd
server_args = -s /tftpboot
disable = no
per_source = 11
cps = 100 2
flags = IPv4
}

disable이 yes로 되어있는데 no로 바꿔주세요^^

5. 이제 서비스를 재시작하면 tftp가 실행된다.
/etc/rc.d/init.d/xinetd restart
service xinetd restart

<우분투>
2. 설치
apt-get install tftp

4. tftp 실행하게 설정 바꾸기
vi /etc/default/tftp-hpa
RUN_DAEMON = "yes"
no로 기본되어있는데 yes로 바꿔주세요

5. 이제 서비스를 재시작하면 tftp가 실행된다.
/etc/init.d/tftp-hpa restart

확인

netstat -au
netstat -al | grep tftp

참고로 방화벽 끄세요~

이렇게 하면재시작 된다


<페도라>
2. 설치
yum install tftp

5. 이제 서비스를 재시작하면 tftp가 실행된다.
/etc/rc.d/init.d/xinetd restart

이제 tftp 설치하고 실행하는고 끝낫네

2009년 4월 13일 월요일

우분투 8.1 VirtualBox 2.0.4 USB 설정기

2008/11/23 23:02 CS&E/운영체제
크리에이티브 커먼즈 라이선스
Creative Commons License
요 즘 db2 공부 때문에 리눅스용 db2 설치를 위해서 간만에 데스크탑에 우분투를 설치했다. 메인으로 리눅스를 올린건 2학년 겨울 방학때 이후로 처음이니 대략 3년 정도만인 듯하다. 당시에는 우분투의 전신인 데비안을 이용해서 TV카드까지 잡고서 나름 3개월 넘는 기간동안 열심히 리눅스 공부했었는데... 지금 생각해보면 뻘짓이었다는 생각이든다.

어쨋든 요즘 우분투를 설치하니 정말로 많은 커스터마이징이 이루어져서 어지간한 작업은 정말로 우분투 만으로도 가능할 정도가 돼었다고 할만했다. 하지만 그래도 여전히 우분투 환경만으로는 해결이 안돼는 업무는 많은지라... 어쩔 수 없이 가상 머신 프로그램인 버박(virtualbox)를 이용해서 게스트 OS를 윈도우로 설치를 시도했다. 이것도 당시와는 많이 달라진 것인데... 가상 머신 프로그램을 이렇게 쉽고 간단히 올릴 수 잇고, 높은 퍼포먼스가 나온다는 사실은 상당히 놀라운 일이다.

문제는 이 녀석이 왠일인지 usb 디바이스를 정상적으로 잡지를 못한다는 것이다. 그래서 구글링을 해보니 역시나 해결책이 존재했다.

출처)http://link.allblog.net/14397664/http://silent2k.tistory.com/106
1. Ubuntu 8.10 ("Intrepid Ibex") 다운로드 / 설치
http://www.virtualbox.org/wiki/Linux_Downloads

2. /etc/init.d/mountdevsubfs.sh에 내용추가
$ sudo gedit /etc/init.d/mountdevsubfs.sh

#
# Mount /dev/pts. Master ptmx node is already created by udev.
#
domount devpts "" /dev/pts devpts -onoexec,nosuid,gid=$TTYGRP,mode=$TTYMODE

#
# Magic to make /proc/bus/usb work
#
mkdir -p /dev/bus/usb/.usbfs
domount usbfs “” /dev/bus/usb/.usbfs -obusmode=0700,devmode=0600,listmode=0644
ln -s .usbfs/devices /dev/bus/usb/devices
mount –rbind /dev/bus/usb /proc/bus/usb

3. usb device 권한 설정 (기존 내용 수정)

$ sudo gedit /etc/udev/rules.d/40-basic-permissions.rules

# USB devices (usbfs replacement)
SUBSYSTEM==”usb”, ENV{DEVTYPE}==”usb_device”, MODE=”0664″, GROUP=”vboxusers”
SUBSYSTEM==”usb_device”, MODE=”0664″, GROUP=”vboxusers”

$ sudo gedit /etc/udev/rules.d/40-permissions.rules

# USB serial converters
SUBSYSTEM=="usb_device", GOTO="usb_serial_start"
SUBSYSTEM=="usb", ENV{DEVTYPE}=="usb_device", GOTO="usb_serial_start"
GOTO="usb_serial_end"
LABEL="usb_serial_start"
ATTRS{idVendor}=="0403", ATTRS{idProduct}=="6001", \
MODE="0666", GROUP="dialout"
LABEL="usb_serial_end"


4. /etc/fstab에 usb mount 추가 (devgid="vboxusers 그룹ID"로 입력..)

$ cat /etc/group | grep vboxusers
vboxusers:x:125:angelos

$ sudo gedit /etc/fstab (위에서 확인한 vboxusers group 넘버로 아래 내용을 추가합니다.)

# usb
none /proc/bus/usb usbfs auto,busgid=125,busmode=0775,devgid=125,devmode=0664 0 0

예전에 마운트 해서 쓰면 우분투에서 잡고 있는 usb 외장 하드를 virtualbox가 가져와서 서로 충돌이 났었는데..
자동으로 우분투에서 빠지고 virtualbox 윈도우로 잡히는걸 확인했다..
윈도우에서 사용해제하면 다시 우분투로 마운트 됩니다..

※ 참고자료
http://arosiqueh.wordpress.com/2008/10/26/virtualbox-204-en-ubuntu-810-rc-con-usb/
이렇게 설정하면 된다고 함. 자 잠시 부팅점... ㅡ.ㅡ;;

원본출처: http://tistory.izyou.net/2460881

2009년 4월 9일 목요일

ubuntu(우분투)에서 rpm 파일 설치하는 방법

ubuntu(우분투)에서 rpm 파일 설치하는 방법

ubuntu에서는 rpm 패키지 파일을 직접 설치하지 않고,
ubuntu용 파일인 deb 패키지 파일로 전환하고 나서 설치하게 된다.

터미널에서 아래와 같이 하여 rpm을 deb로 전환해 주는 alien이라는 패키지를 설치한다.
sudo apt-get update
sudo apt-get install alien

rpm패키지를 deb패키지로 전환하려면 다음과 같이 한다.

터미널에서
sudo alien -k --script 변환할_파일.rpm

이와 같이 변경을 하면 우분투에서 설치할수 있도록 .deb 파일로 변환되고
이를 설치하면 된다

2009년 3월 31일 화요일

http://svn.openmoko.org/

http://svn.openmoko.org/
http://svn.openmoko.org/branches/src/target/kernel/2.6.23.x/patches/

2009년 3월 29일 일요일

mkimage를 이용한 vmlinux image로 uImage 만들기

008 11/3 mkimage를 이용한 vmlinux image로 uImage 만들기 Linux

2008/11/03 10:02

복사 http://blog.naver.com/chois76/110037038273

가끔 어떤 linux source를 받아서 compile을 하면, uImage가 생성되지 않는 경우가 있다.

이때, uImage를 어떻게 만들수 있을까?

우연하게도 uboot의 README file에서 답을 찾을 수 있었다.

"경로"만 주의하면 된다.

====================================================
The "uImage" build target uses a special tool (in 'tools/mkimage') to
encapsulate a compressed Linux kernel image with header information,
CRC32 checksum etc. for use with U-Boot. This is what we are doing:

* build a standard "vmlinux" kernel image (in ELF binary format):

* convert the kernel into a raw binary image:

${CROSS_COMPILE}-objcopy -O binary \
-R .note -R .comment \
-S vmlinux linux.bin

* compress the binary image:

gzip -9 linux.bin

* package compressed binary image for U-Boot:

mkimage -A ppc -O linux -T kernel -C gzip \
-a 0 -e 0 -n "Linux Kernel Image" \
-d linux.bin.gz uImage
=====================================================

mkimage를 본 김에 다른 기능들도 살펴보자.

1. image integration
2. image information display

=====================================================
The "mkimage" tool can also be used to create ramdisk images for use
with U-Boot, either separated from the Linux kernel image, or
combined into one file. "mkimage" encapsulates the images with a 64
byte header containing information about target architecture,
operating system, image type, compression method, entry points, time
stamp, CRC32 checksums, etc.

"mkimage" can be called in two ways: to verify existing images and
print the header information, or to build new images.

In the first form (with "-l" option) mkimage lists the information
contained in the header of an existing U-Boot image; this includes
checksum verification:

tools/mkimage -l image
-l ==> list image header information

The second form (with "-d" option) is used to build a U-Boot image
from a "data file" which is used as image payload:

tools/mkimage -A arch -O os -T type -C comp -a addr -e ep \
-n name -d data_file image
-A ==> set architecture to 'arch'
-O ==> set operating system to 'os'
-T ==> set image type to 'type'
-C ==> set compression type 'comp'
-a ==> set load address to 'addr' (hex)
-e ==> set entry point to 'ep' (hex)
-n ==> set image name to 'name'
-d ==> use image data from 'datafile'

Right now, all Linux kernels for PowerPC systems use the same load
address (0x00000000), but the entry point address depends on the
kernel version:

- 2.2.x kernels have the entry point at 0x0000000C,
- 2.3.x and later kernels have the entry point at 0x00000000.

So a typical call to build a U-Boot image would read:

-> tools/mkimage -n '2.4.4 kernel for TQM850L' \
> -A ppc -O linux -T kernel -C gzip -a 0 -e 0 \
> -d /opt/elsk/ppc_8xx/usr/src/linux-2.4.4/arch/ppc/coffboot/vmlinux.gz \
> examples/uImage.TQM850L
Image Name: 2.4.4 kernel for TQM850L
Created: Wed Jul 19 02:34:59 2000
Image Type: PowerPC Linux Kernel Image (gzip compressed)
Data Size: 335725 Bytes = 327.86 kB = 0.32 MB
Load Address: 0x00000000
Entry Point: 0x00000000

To verify the contents of the image (or check for corruption):

-> tools/mkimage -l examples/uImage.TQM850L
Image Name: 2.4.4 kernel for TQM850L
Created: Wed Jul 19 02:34:59 2000
Image Type: PowerPC Linux Kernel Image (gzip compressed)
Data Size: 335725 Bytes = 327.86 kB = 0.32 MB로
Load Address: 0x00000000
Entry Point: 0x00000000

NOTE: for embedded systems where boot time is critical you can trade
speed for memory and install an UNCOMPRESSED image instead: this
needs more space in Flash, but boots much faster since it does not
need to be uncompressed:

-> gunzip /opt/elsk/ppc_8xx/usr/src/linux-2.4.4/arch/ppc/coffboot/vmlinux.gz
-> tools/mkimage -n '2.4.4 kernel for TQM850L' \
> -A ppc -O linux -T kernel -C none -a 0 -e 0 \
> -d /opt/elsk/ppc_8xx/usr/src/linux-2.4.4/arch/ppc/coffboot/vmlinux \
> examples/uImage.TQM850L-uncompressed
Image Name: 2.4.4 kernel for TQM850L
Created: Wed Jul 19 02:34:59 2000
Image Type: PowerPC Linux Kernel Image (uncompressed)
Data Size: 792160 Bytes = 773.59 kB = 0.76 MB
Load Address: 0x00000000
Entry Point: 0x00000000


Similar you can build U-Boot images from a 'ramdisk.image.gz' file
when your kernel is intended to use an initial ramdisk:

-> tools/mkimage -n 'Simple Ramdisk Image' \
> -A ppc -O linux -T ramdisk -C gzip \
> -d /LinuxPPC/images/SIMPLE-ramdisk.image.gz examples/simple-initrd
Image Name: Simple Ramdisk Image
Created: Wed Jan 12 14:01:50 2000
Image Type: PowerPC Linux RAMDisk Image (gzip compressed)
Data Size: 566530 Bytes = 553.25 kB = 0.54 MB
Load Address: 0x00000000
Entry Point: 0x00000000

=====================================================

linux path 설정

export PATH=$PATH:$JAVA_HOME/bin:$JAVA_HOME/jre/bin

Buildroot on Ubuntu

Buildroot on Ubuntu

From GumstixDocsWiki

Jump to: navigation, search

Getting a Linux machine configured to build the Buildroot isn't that hard. The key is knowing what the package manager of your particular Linux distro calls the various packages required to build software. On Ubuntu 6.06, Here's the list of packages that you need to fetch and install:

Contents

[hide]

To Build the Buildroot

  • build-essential - this installs a complete build environment
    • This gets you all the necessary packages to build software, like gcc,autoconf,automake,libtool etc.
  • openssl-dev (on Ubuntu 7.04, 7.10 or 8.04, libssl-dev is needed instead)
  • libncurses-dev
  • bison
  • flex
  • texinfo
  • zlib1g-dev
  • gettext
  • autoconf
  • patch(ubuntu 8.04, maybe on others too, only tested it on this one)

These are the exact package names (on Ubuntu), so you can issue this command in a terminal without having to mess around with the graphic package managers:

sudo apt-get install build-essential libncurses-dev bison flex texinfo zlib1g-dev gettext openssl-dev autoconf

Note: on Ubuntu 8.04 you don't need the package openssl-dev (openssl stuff is already installed)

Pre-build requirements

There are some pre-build dependencies that also must be met:

  • a subversion client - to fetch the buildroot
  • wget - the build scripts use wget to download packages

My Hardy system did not have "mpfr" so you may need to install it too. I found it in synaptic with mpfr, but the full name is something like libmpfr-dev. I don't know the apt-get incantation.


sudo apt-get install subversion wget

Ubuntu uses dash instead of bash for /bin/sh. If you leave dash as your shell, you'll gets lots of "-e"'s stuck in various files. You can switch back to bash by doing:

sudo dpkg-reconfigure dash

and select No

Post-build requirements

There are some post-build dependencies that also must be met:

  • tftpd - (optional) a tftpd server to install the filesystem over ethernet
  • ckermit - (optional) to connect to the console and to upload newly built filesystem
  • lrzsz - (optional) to use zmodem/xmodem transfers to upload files to linux if you can't use ssh/scp
sudo apt-get install ckermit tftpd-hpa lrzsz

If you get an error that it can't find ckermit, you need to add "multiverse" to your list of components in sources.list. Add it on the same lines that contains the "universe":

deb http://xx.archive.ubuntu.com/ubuntu/ edgy universe multiverse
deb-src http://xx.archive.ubuntu.com/ubuntu/ edgy universe multiverse

Possible Problems

If you get an error: Compilation aborted. Please read the FAQ for linux-libc-headers package./usr/include/linux/config.h and delete both lines. then edit

If you find some lines with just a "-e" on them in your /etc/modprobe.conf file on the gumstix, then you'll probably find that /bin/sh is symlinked to a program called dash. If you change the symlink to be /bin/bash then the -e flags will disappear the next time the /etc/modprobe.conf file is created (you'll need to manually remove them to start with). You can remove them on the host side by editing the gumstix-buildroot/build_arm_nofpu/root/etc/modprobe.conf. You'll probably also find some -e lines in the /etc/network/interfaces file as well.

USB로 넷북에 우분투 설치하기

USB로 넷북에 우분투 설치하기 (MSI U100기준) ll 넷북에서 놀자 !!

2009/02/10 16:53

복사 http://blog.naver.com/mk4236/90042056878

요즘 넷북을 많이 사용하는데, 역시나 윈도우는 너무 크고 무겁다.

어차피 넷북에서 게임을 할것도 아니고..가벼운 리눅스를 설치해 사용해 보자

개인적인 생각으로는 우분투가 현재로써는 가장 나은 버젼이라고 생각한다.

뭐.. 페도라로 서버를 구축하고 하는 일은 했지만..

데스크 탑 용으로는 역시나 자동으로 이것저것 잡아주는 우분투가 제격.

MSI의 넷북 Wind U100으로 설치과정을 함께 하겠다.

내용은 아무것도 모르는 극 초보자들을 위해 아주 상세히 적도록 노력했다.

모르는게 있으면 답글에 질문하면 친절하게 알려주도록 노력하겠다.


1. 일단 우분투를 다운로드 받아보자.

리눅스는 프리웨어(즉 공짜)이기 때문에 걍 받아써도 불법이 아니다.

일단 네이버에서도 다운로드가 되기 때문에 네이버에서 최신 버젼을 다운로드 받는다.

친절하게 링크도 걸어주도록 하겠다.

[우분투 다운로드]


2. USB 메모리 스틱을 우분투 설치 메모리 스틱으로 만들어줄 파일을 받자.

넷북은 보통 cd롬이 없다. 그래서 usb 메모리 스틱을 CD롬처럼 만들어 주는 것이다.

있는 경우에는 그냥 위의 파일을 구어서 CD 부팅을 해주면 되겠다.

여튼 이 글을 읽는 사람은 아마도 u100이라는 생각하에 적겠다.

[http://unetbootin.sourceforge.net/]

위의 링크를 따라가면 영어로된 페이지가 나온다.

좌측 상단에 Download (for window)라고 쓰인 파란 박스를 누르면 파일이 다운로드 된다.

(익스플로러 사용시에는 노란 라인이 떠주신다. 눌러서 다운로드 받자.)

unetbootin-windows-312 ->이것과 비슷한 파일이 받아 질 것이다.(버젼이 다를 수 있다는 얘기)

그렇다면 일단 우분투를 깔기 위한 준비는 다 되었다.

ubuntu-8.10-desktop-i386.iso

unetbootin-windows-312.exe

이둘과 같거나 버젼이 다른 두 파일이 있다면 일단 설치준비 끝이다.


3. 설치용 USB를 만들자.

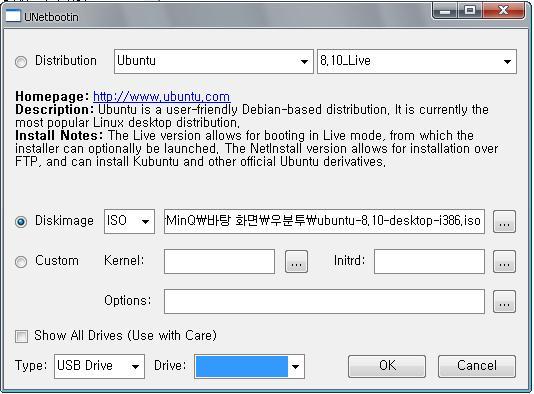
위에서 받은 unetbootin-windows-312.exe파일 (혹은 비슷한 이름의 파일)을 실행시켜 다음과 같이 만들어 주자.

ISO파일이 없을경우

일단 맨위 Distribution 부분에 처음껀 Ubuntu 그 다음엔 8.10_Live 선택

(Distribution을 선택할경우 선택한 ISO이미지를 자동으로 다운로드 해 줍니다.

세르님 댓글보고 수정하였습니다. 감사합니다 ^^)

ISO파일이 있을경우

Diskimage 앞에 체크표시 해준다.

...을 눌러 다운받은 ISO파일을 선택.

( ISO이미지가 있고 선택했는데도 에러가 발생한다면,

Distribution을 설정한 뒤에 ISO파일이 있을 경우의 방법으로 해보도록 하자.

필자의 경우는... 그렇게 해결을 봤다 =ㅅ=;;;

필수는 아니고 하나의 팁... 이랄까?)

그리고 아래 TypeUSB Drive 설정하고 Drive에 자신의 USB메모리의 드라이브 설정해준다.

지금은 USB가 안꼽혀 있어서 안나오는데 아마 자동으로 나올것이다.

이제 OK를 눌러주면 뭘 한참 한다.

4%정도에서 멈춰있는데, 에러가 아니다. 파일이 큰게 있는지 좀 오래 서 있더라.

이젠 준비는 완료 됬다.

이제 설치로 넘어가 보자.


여기까지 왔다면 반은 왔다.이제 설치만이 남았다.

설치는 간단하니 긴장하지 않아도 된다.

뭐.. 다 한글로 나오니..

4. USB로 부팅을 하자.

USB메모리로 부팅을 하자.

U100기준으로 작성을 하겠으며 컴퓨터 마다 다 다른데.. 거의 F12누르면 된다.

바이오스에서 설정해 주는 방법도 있기는 한데..

그건 알아서 검색해 보기를 바란다.

U100의 경우 부팅 첫 화면 로고 나올때 F11을 누르면 부팅 메니저가 나온다.

이것저것 나오는데 그중 자신의 usb메모리 이름이 있을 것이다.

선택한다.

끝...


5. 설치

설치시에 맨처음 언어설정은 한국어로 해준다.

중간에 키보드 설정은 한글 키보드 (101/104 호환으로 해준다)

파티션 설정 외에는 다 넥스트만 해주면 된다.

신비롭게도 우분투는 설치화면이 우분투 초기화면과 같다.

하긴.. 그냥 USB에다 설치해서 쓰기도 하니깐...

더더욱 놀라운 사실은 u100을 쓰고 있다면 사운드도 나온다는 것이다.

아예 다 잡혀져 있다. 블루투스나, 랜, 사운드 카드 등등..

좋구나.. 좋은 세상인게야..

여튼 감동을 뒤로한체 바탕화면을 살펴보자

install이라고 적힌 아이콘이 있다.

과감한 더블클릭.

설치 화면이 나온다.

순서는 잘 모르겠는데..

여튼 넥스트 일곱번 누르면 끝이다.

일단 초반에 언어 설정이 US로 되어있는데 한글로 바꿔주자.

왜냐면.. 내가 그렇게 해줬으니깐..

안바꿨을때 영문리눅스에서 한글로 바꾸는 등의 설정을 해줄 수는 있지만..

내가 안해봐서 모르겠다.

그냥 넥스트만 휘갈기자..

* 중간에 파티션에 대한 것이 나온다.

필자의 경우에는 윈도우와 같이 쓸것도 아니고,

그렇다고 뭐 중요한것도 없었기에 그냥 자동으로 했다.

어차피 코딩용으로, 그리고 문서 및 동영상이 전부이므로 디테일한 설정은 안 찾아봤다.

필요하면 그건 따로 검색하시길..

뭔가 혼자 막 설치하고 그런다.

재부팅이 되면 이제 설치는 마무리이다.


6. 설치 후

U100을 사용한다면..

블루투스도 잡히고, 랜도 잡힌다.

물론 사운드도 또랑또랑 잘 나온다.

그리고 FN키를 이용한 사운드 및 기타 시스템 제어도 완벽히 동작한다.

* 그러나 문제는 무선랜이 안잡히고,분명 한글이 안써질 것이다.

나의 한/영 키는 Alt 키가 되있을 뿐이고!!!!

그에 대한 내용은 따로 정리를 하였다. 아래의 링크를 따라가 보자.

* 무선랜 설정

[http://blog.naver.com/mk4236/90042057444]

* 한글 입력 설정

[http://blog.naver.com/mk4236/90042059259]


2009년 3월 28일 토요일

Ubuntu Linux : 우분투 리눅스

http://myubuntu.tistory.com/

우분투에 개발환경 구축

우분투가 아무래도 데스크탑 지향이라 개발환경용으로는 gcc도 설치되지 않은 환경이다.
개발환경을 구축하려면 다음행을 입력하자

#sudo apt-get install build-essential

펌 Fedora 10 에서 Adobe Flash Player 설치하기

펌 Fedora 10 에서 Adobe Flash Player 설치하기 | 리눅스
전체공개 2009.03.25 23:25
  1. yum 을통해서 플래쉬 플레이어를 설치하는 과정을 설명한다.
  2. 터미널을 연다.
  3. 루트 권한으로 작업을 시작한다.
    su -
  4. yum에 등록된 리포지터리에서
  5. 추가 설치
    yum install flash-plugin nspluginwrapper.{i386,x86_64} pulseaudio-libs.i386 alsa-plugins-pulseaudio.i386 libcurl.i386
  6. 브라우저에 제대로 설치되었는지 확인한다.
    mozilla-plugin-config -i -g -v

  7. 출처 : http://utsman.net/category/UNIX/Fedora?page=5
원본출처: http://cafe.naver.com/candan.cafe?iframe_url=/ArticleRead.nhn%3Farticleid=2102

2009년 3월 27일 금요일

rpmbuild

rpmbuild

참고 : rpmbuild 명령은 rpm-build 패키지에 포함 되어 있다. rpm-build 패키지의 버젼에 따라 다른 부분이 있을수 있으며, 이 문서는 rpm-build-4.4.2-15.2.1.by 를 기준으로 작성되었다.

보통 작업디렉토리가 위치하는 곳은 /usr/src 이고, /etc/rpmrc 파일에서 바꿔줄수 있다고 한다.

: 각 벤더 마다 디렉토리가 다르다.

/usr/src//BUILD : rpm 파일을 만들기 위한 작업 디렉토리.

/usr/src//SOURCES : 소스 압축파일이나 패치파일을 위치시킨다.

/usr/src//SPECS : spec 파일을 위치시킨다.

/usr/src//RPMS : 만들어진 rpm 파일이 저장되는 곳.

/usr/src//SRPMS : 만들어진 src.rpm 파일이 저장되는 곳 .

#rpmbuild -bp

: /usr/src//BUILD 디렉토리에 패치가 적용된 상태까지만 빌드 된다.

주로 diff를 이용하여 patch 파일 제작시 많이 이용되는 옵션.

#rpmbuild -ba

: /usr/src//RPMS// 에 rpm 바이너리 생성.

/usr/src//SRPMS/ 에 source RPM 생성.

#rpmbuild -ba --rmspec

: 빌드를 마치고 SPCE 파일을 제거 한다.

#rpmbuild -ba --rmsource

: 빌드를 마치고 /usr/src//SOURCES/ 의 소스를 지운다.

#rpmbuild -ba --clean

: 빌드는 마치고 /usr/src//BUILD/ 의 빌드과정중 생겨난 디렉토리를 지운다.

#rpmbuild -ba --rmspec --rmsource --clean

: 빌드는 마치고 SPEC 파일과 소스, 빌드디렉토리를 비운다. RPM 과 SRPM 파일만 생성.

태그

페이지 히스토리

2008-01-08 16:47 에 freecatz님이 마지막으로 수정

원본출처: http://tong.nate.com/kimgua/48599657

Fedora 10 쓸만하게 설정해보기

Fedora 10 쓸만하게 설정해보기 Mr.눅스 리(Linux)

2008/12/31 00:32

복사 http://blog.naver.com/myrilke/150040009713

뭐...제목은 대단해보입니다만..
내용은 결국 기본 유틸리티들 설치하는 법이니 낚였다고 너무 화내지 마시길...^^;;;
추신: 되도록이면 순서대로 진행하실 것을 권장합니다...그냥 그렇다구요...-3-
출처: http://spind.net/tag/fedora10/

1. 공짜 repository와 유료 repository에 둘 다 접근할 수 있도록 설정한다~
# rpm -Uvh \
# http://download1.rpmfusion.org/free/fedora/rpmfusion-free-release-stable.noarch.rpm \
# http://download1.rpmfusion.org/nonfree/fedora/rpmfusion-nonfree-release-stable.noarch.rpm

뭐...어짜피 공짜가 아닌 프로그램 다운로드 해도 불법 소프트웨어 단속반이 당신 컴퓨터를 막 뒤지기 전까진 아무도 신경쓰지 않을 것이다~_~ (물론 그거에 신경쓰이는 나는....쩝;;;)

2. 깔끔하게 reset후 업데이트가 적용될 수 있도록 하자.
# yum clean all
# yum upgrade -y

아마 꽤~~~나 많이 다운로드 받을 것이다...인내심을 가지고....그냥 켜두고 딴일 하도록 하자...-ㅅ-

3. 비디오 코덱. 포기할 수 없어~~
비 디오 코덱은 원래 라이센스 문제때문에 기본으로 페도라에 설치되어 있진 않다. 그러나....리눅스에서도 영화나 음악을 즐기고 싶다면 당연히 설치해줘야 하므로... GStreamer 패키지들을 설치해주자~ 글쓴이는 뭐 이것저것 섬세하게 설치하던데....나로써는 귀찮으므로 명령어 하나로 쇼부를 보자~!
# yum install -y gstreamer-*
물론 글쓴이가 하는 것보단 이것저것 확실히 많이 설치가 되겠지만... 나중에 어딘가 쓸모가 있겠죠...그렇겠죠??하하;;;
용량문제를 심히 고려하신다면 원저자(위의 링크 참고)의 명령을 따라하세요...- _-a

4. 이젠 컨텐츠 플레이어를 설치해보자~!
인 터넷을 찾아보면 이런저런 플레이어들이 많은데 개인적으론 MPlayer를 써보고자 한다.(vlc는 너무 썰렁해요...-_-;;; 뭔가 잘못 알고 있는 걸지도 몰라요...그냥...개인적인 견해로는...그래요...;) 일단은 두가지 다 적어보겠다.
# yum install -y vlc
# yum install -y mplayer

5. 다음은 요즘세상에는 필수적인 플래시 플레이어인데...
알 사람들은 아시겠지만 x86_64 OS용 아도비 플래시 플레이어는 정식 출시되지 않았다...ㅡㅡ;;; 아주 쓋한 이 상황에서 해결방법은 gnash plugin을 설치해주는 것이다~(매우 고마울 뿐이다.ㅠ) 글쓴이는 adobe Lab의 비공식 버젼을 설치해주는 것을 설명하고 있는데...이보다 gnash plugin 설치가 더 편하다...-ㅅ- 그냥 시스템 메뉴에서 add/remove software에서 web-client flash movie player plugin이 라는 것만 설치해주면 되기 때문이다(저는 혹시나 해서 Mozilla/Gecko player Flash plugin using swfdec도 설치했지만...아마 안 해도 잘 나올껍니다.) 그래도 난 굳이 아도비껄 써야겠다면...원 저자의 홈피를 참고하세요~~

여기에 계속 생각나는대로 더 적어볼까 한다...
과연...업데이트가 될까...ㅡㅡ;;;;

원본출처: http://blog.naver.com/myrilke?Redirect=Log&logNo=150040009713